IMPORTANT: Proceed with a visual inspection of the strips before installation. The warranty does not extend to cover the flooring after installation. Once installed, any board is considered accepted by the installer and the owner, even if the owner is absent at the time of installation.
Useful
Installation Guides
Installation Manual
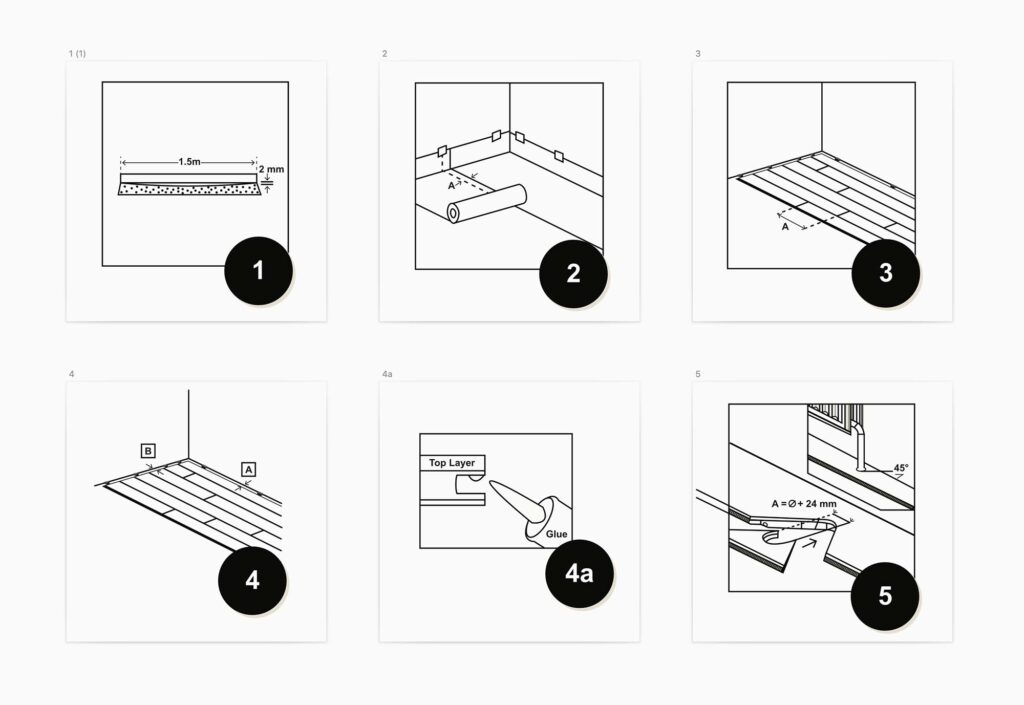
The laying direction of the parquet panels should be decided before installation begins. The direction will depend on the shape of the room and the position of the windows. We recommend laying the panels along the longer wall and/or parallel with the natural lighting. Having determined the direction, the room width must be measured. This width should be reduced by 25 mm (for expansion gap) and divided by 204 (the width of a parquet board). In this way the number of rows of parquet boards can be calculated, as well as the width of the last row. If the last board width is narrower than 70 mm, then we recommend that the first board to be laid should also be trimmed in order to give a pleasing balance to the finished floor.
1. Laying of the floor should commence by placing the underlay material on top of the damp proof membrane [as necessary] The membrane, such as 0.2 mm polyethylene, should be placed beneath the underlay with a 20cm overlap at any joints and these should then be taped. The underlay itself must fit flush, not overlapped.
2. The first row of floorboards should be laid with the lock tongue facing the wall.
3. Along the shorter edges the panels should be joined by sliding the profiled (lock) elements of the next board at about a 30 degrees angle. By lowering the board into a horizontal position the lock is engaged. You may use the hammer and block on the panel from the short edge to secure the lock completely
4. When the first row has been assembled, it should be placed along the wall with 10-15 mm gaps on the 3 sides, using wooden wedges or waste pieces of the parquet.
5. The next row should be started using the length remaining from the previous row provided it is longer than 50 cm. If the off-cut is shorter than 50 cm – then a new parquet panel should be cut into half and 1 of the pieces should be used to start the row. Please ensure that short – edge joints are placed at a minimum distance of 50 cm away from each other in adjacent rows.
6. There are 2 ways to lay ESTA PARKET. We recommend the method described under 6B.
6.A Slightly lift the edge of the parquet panel and insert the tongue into the groove of the previous row and press it together so that there is no gap between them, and then press down to the floor until the boards are locked. You may need to use the hammer and block to fix the panel up tight to the previous row. The next board should be placed the same way leaving 5-7 mm distance between the short edges. Then the short edges need to be locked using the hammer and block and the wooden wedges applied at the end of the completed rows.
6.B Assemble the 1st row of parquet as described in point 2 above (laying the first row). When this row has been assembled completely allowing for expansion gaps etc. as described in method ‘A’, the whole row is inserted into the groove of the 1st row and then pressed down slowly until the lock engages. Using the hammer and block the whole length can be pushed up tight to the previous row.
7. The exercise is then repeated until only one row remains to be fitted.
8. The last row of parquet boards should be measured carefully as it is essential that, as previously described, an expansion gap is left all the way around the perimeter of the laid floor. If necessary, it should be cut to achieve correct width. Select an area to comment on
9. A gap of 10-15 mm wide should be left and the final row tightly pressed to the penultimate row using wooden wedges or hooks.
10. When the flooring has been completely laid, the wedges should be removed. The last task is to conceal the expansion gap and this can be achieved by any number of timber profiles available. The chosen profile should be fixed to the wall and NOT fixed to the ESTA PARKET floor otherwise it would prohibit the natural slight movement inherent in any timber construction.
Click
Installation Manual
The laying direction of the parquet panels should be decided before installation begins. The direction will depend on the shape of the room and the position of the windows. We recommend laying the panels along the longer wall and/or parallel with the natural lighting. Having determined the direction, the room width must be measured. This width should be reduced by 25 mm (for expansion gap) and divided by 204 (the width of a parquet board). In this way the number of rows of parquet boards can be calculated, as well as the width of the last row. If the last board width is narrower than 70 mm, then we recommend that the first board to be laid should also be trimmed in order to give a pleasing balance to the finished floor.
1. Laying of the floor should commence by placing the underlay material on top of the damp proof membrane [as necessary] The membrane, such as 0.2 mm polyethylene, should be placed beneath the underlay with a 20cm overlap at any joints and these should then be taped. The underlay itself must fit flush, not overlapped.
2. The first row of floorboards should be laid with the lock tongue facing the wall.
3. Along the shorter edges the panels should be joined by sliding the profiled (lock) elements of the next board at about a 30 degrees angle. By lowering the board into a horizontal position the lock is engaged. You may use the hammer and block on the panel from the short edge to secure the lock completely
4. When the first row has been assembled, it should be placed along the wall with 10-15 mm gaps on the 3 sides, using wooden wedges or waste pieces of the parquet.
5. The next row should be started using the length remaining from the previous row provided it is longer than 50 cm. If the off-cut is shorter than 50 cm – then a new parquet panel should be cut into half and 1 of the pieces should be used to start the row. Please ensure that short – edge joints are placed at a minimum distance of 50 cm away from each other in adjacent rows.
6. There are 2 ways to lay ESTA PARKET. We recommend the method described under 6B.
6.A Slightly lift the edge of the parquet panel and insert the tongue into the groove of the previous row and press it together so that there is no gap between them, and then press down to the floor until the boards are locked. You may need to use the hammer and block to fix the panel up tight to the previous row. The next board should be placed the same way leaving 5-7 mm distance between the short edges. Then the short edges need to be locked using the hammer and block and the wooden wedges applied at the end of the completed rows.
6.B Assemble the 1st row of parquet as described in point 2 above (laying the first row). When this row has been assembled completely allowing for expansion gaps etc. as described in method ‘A’, the whole row is inserted into the groove of the 1st row and then pressed down slowly until the lock engages. Using the hammer and block the whole length can be pushed up tight to the previous row.
7. The exercise is then repeated until only one row remains to be fitted.
8. The last row of parquet boards should be measured carefully as it is essential that, as previously described, an expansion gap is left all the way around the perimeter of the laid floor. If necessary, it should be cut to achieve correct width.
9. A gap of 10-15 mm wide should be left and the final row tightly pressed to the penultimate row using wooden wedges or hooks.
10. When the flooring has been completely laid, the wedges should be removed. The last task is to conceal the expansion gap and this can be achieved by any number of timber profiles available. The chosen profile should be fixed to the wall and NOT fixed to the ESTA PARKET floor otherwise it would prohibit the natural slight movement inherent in any timber construction.
⚠️ Important: This product is designed for use in rooms with normal humidity (6-12%) and stable temperature. Usage in conditions of high humidity or extreme temperature fluctuations may affect the product’s lifespan and warranty.
PDF Files

Herringbon&Chevron installation manual
Click installation manual

T&G installation manual
T&G Installation